Table of Contents
Are you ready to change the annoying image that Windows 10 automatically assigns to your Windows 10 user account? For each newly created user account, Windows selects an overall silhouette. Feel free to change the image to something that reflects your reality: You can take a picture with your computer’s webcam or select any photo from your Images folder.

Change User Account Picture for Windows 10/8 Account
Unlike earlier versions of Windows, Windows 10 and Windows 8 do not include an option to change the account image using the User Accounts applet in the Control Panel. You must now change it via the PC settings. Here’s how it works:
- Click the “Start” button or press the “Windows logo” key on your keyboard. This opens the Start menu (or splash screen).
- Right-click on the account image in the upper left corner of the Start menu and select “Change Account Settings”. If a splash screen appears, right-click on the account image in the upper right corner of the splash screen and select “Change Account Image”.
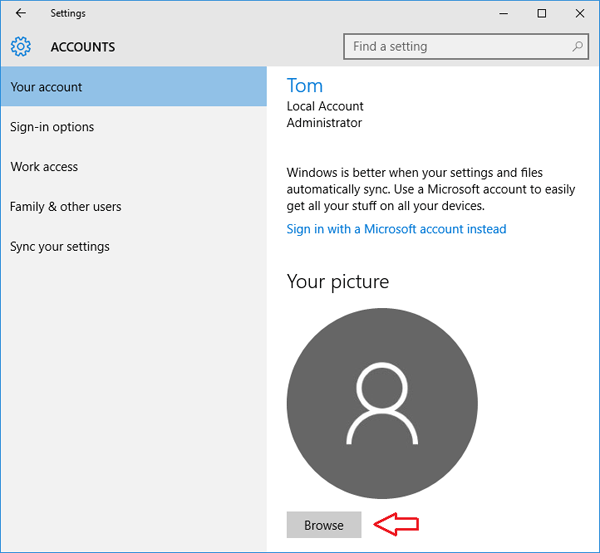
- Windows displays the “PC Settings” screen below. From there you can see the picture of your current account. Click the “Browse” button and select your favorite image that you want to set as your new account image.
Change User Account Picture for Microsoft accounts
If you use a Microsoft account, you can always update your profile picture using the Settings application. Continue to use the process described above. You can also use your Microsoft account website to edit your photo from anywhere, even without access to your PC.

- Whichever method you use, the change applies to all Microsoft services that display your profile picture. It may take some time for the new picture to display on all websites and devices.
- To use the online method, log in to account.microsoft.com and click the “Your Information” button at the top of the page. Click on the “Change Image” link to start the selection process.
- The image selection opens in a simple editor that allows you to crop your current photo. Click on the “New Image” button to select another image from your file system. You can then crop and resize it as you wish.
- Once you have saved the changes, the new profile image should be applied to all your Windows devices. It will also appear in Microsoft online services such as Outlook.com and Office.com.
Delete an account image
Windows is designed so that you can switch from your three most recent photos to the “Your Info” page. If you really need to delete one of the photos from your account
- Open the file explorer in the taskbar. If you do not see File Explorer on the taskbar, choose Start, then type File Explorer.
- Go to C:C:Use Your Name\AppData\Roaming\Microsoft\Window\Image Account.
- Replace your name with your account name.
- If you cannot find the AppData folder in File Explorer, it may be hidden. Select the Display setting and check the box next to Hidden Items to display all items in a folder.
- Delete the photo from the account you no longer want to use.
https://support.microsoft.com/en-us/help/17152/windows-10-change-your-account-picture

