Can you relate to being constantly bothered by spam bots transmitting spam comments on your site as mosquitoes on a hot summer night? If so, do not be troubled. There is an answer for your problem and it comes in form of the CAPTCHA. CAPTCHA, better known as Completely Automated Public Turing test to tell Computers and Humans Apart, has a huge influence on the safety of your website.
Attempting to safeguard Internet users from any threats while requiring as little of an effort as they possibly can is paramount. First, we will discuss how to add a CAPTCHA to your website that’s compliant with the GDPR.

Why You Should Have CAPTCHA on Your Website
CAPTCHA is used as a gatekeeper to ensure that only individuals human pass through your applications’ doors if not it could quickly turn into a neighborhood overrun by spammers and bots. If CAPTCHA is not incorporated into your website, it can lead to your online community quickly turning out to be inundated with spambots and malicious attackers. These malicious bots can creep into your websites and cause damage.
Now, lets look how you can add one to your site.
How to Add a CAPTCHA to Your WordPress Forms?
There are only three easy steps to follow
Step 1. Begin With Installing the WP Login Lockdown Plugin

Installing the WP Login Lockdown plugin is the first action to take in order to comply with GDPR with regards to eliminating the CAPTCHA software. You will receive an email to your newly purchased dashboard containing the Password configured for the plugin. The notification will direct you to a download button after you sign up for the account. It works if you want to see the ZIP file your plugin store.
In addition to WP Login Lockdown, implement WP Captcha to further secure your WordPress forms. This plugin adds advanced CAPTCHA challenges, ensuring only genuine users can interact with your site, aligning with GDPR requirements.
Depending on WordPress, all you have to do is extract the ZIP file from your directory before uploading the plugin your site. The procedure is exactly the same as that of a typical plugin. Then your site is ready to utilize your WP Login Lockdown plugin. Moving onward will be simple.
Step 2. Activating the License

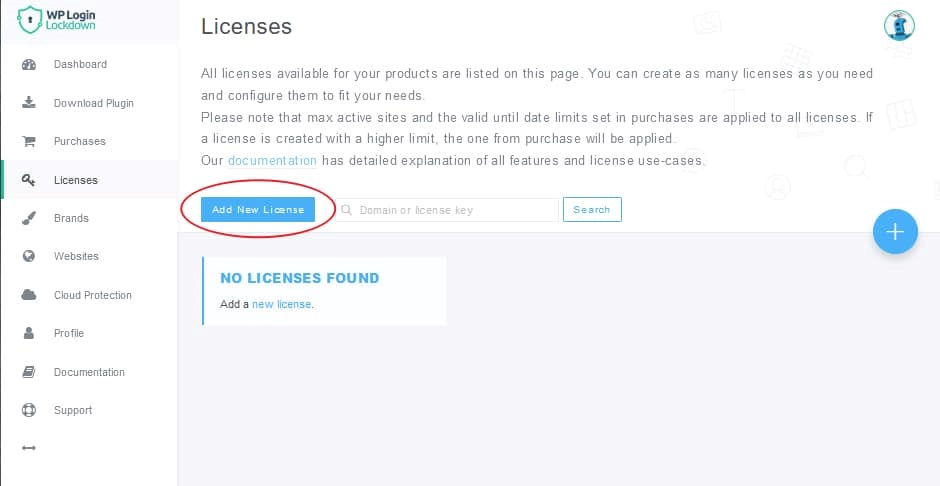
The next step is to activate the license. You can use it to confirm that your accounts are linked up to your website. You can create fresh licenses for your websites using the Licenses option on your Dashboard. When you are ready to rekey the licence, click the Add New License button.
Always select the Key license type, else the license generator will ask you to select your Domain. All you need to do is press Create and Activate License when you have selected the proper configuration. As soon as you receive your license key, go to your WordPress plugin and put it there. You ve now successfully activated the WP Login Lockdown.
Step 3. Enabling the hCAPTCHA

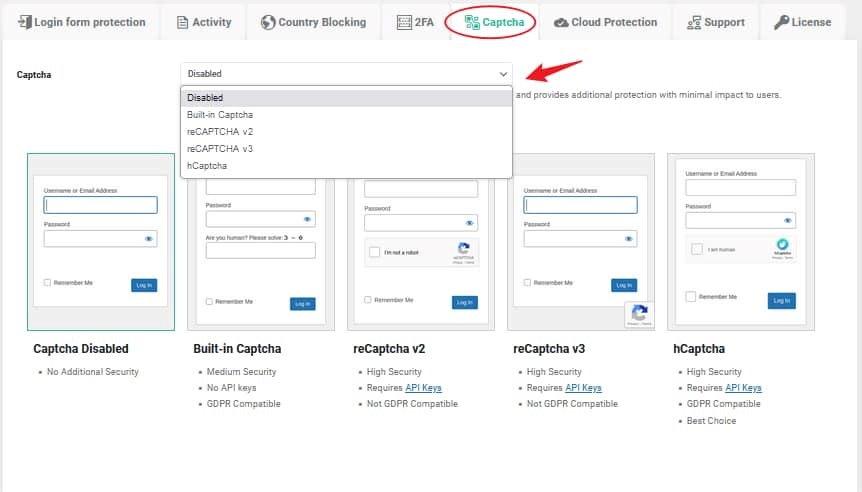
We completed the last step. Amongst different Captcha choices, we have used the Built-in Captcha as well as the hCaptcha Captcha. The choice with the strongest security is the hCaptcha, which integrates the login and Captcha procedures. This advice means that your subscribers need to fill out a profile and reinvent the regular Integrated Captcha, which maximizes login security.
Aside from being GDPR compliant, hCaptcha makes this plugin perfect for any website that must adhere to EU regulations. All you have to do is choose it from the list of choices available in the Captcha tab. Congratulations, you now have a functioning CAPTCHA on your website.
To Sum Up
Maintaining the highest possible level of security should be your top priority for your site, regardless of the decisions that you want to make with it. You can use an hCaptcha and keep your WordPress login PIN under lock and key with WP Login Lockdown. This enables you to be certain that no hacker will be able to access your site and jeopardize your job.
To complement your security measures, use WP Force SSL for ensuring all site traffic is encrypted and secure, enhancing user trust and site reliability.

